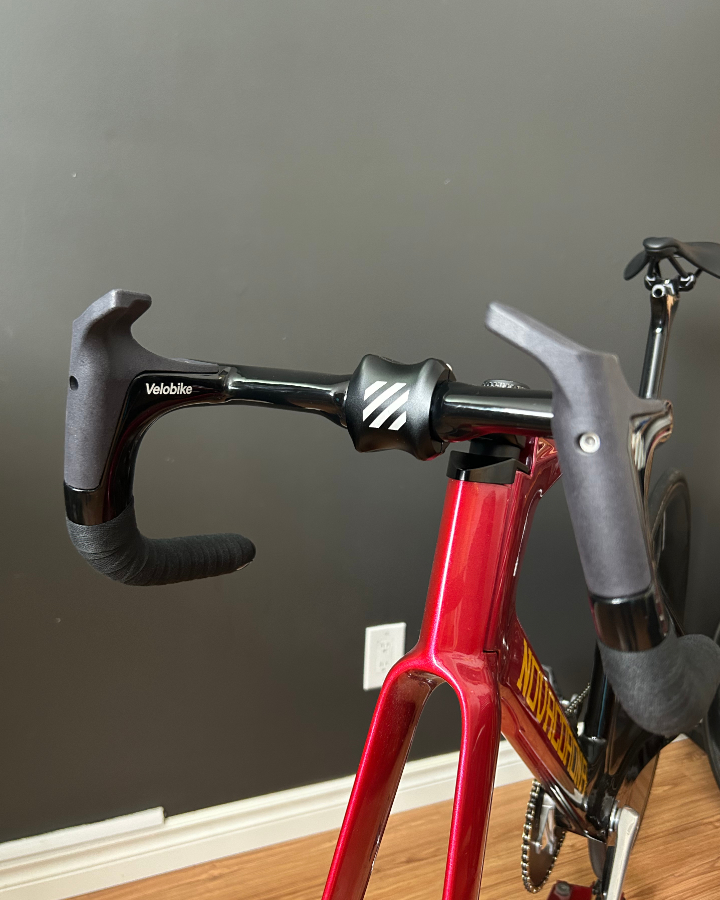
As far as I know, the Velobike Skat Endurance Handlebar is the first modular handlebar on the market.
By modular, I mean that it can be adapted to offer different types of hand positions and (to be confirmed) to different aerodynamic characteristics.
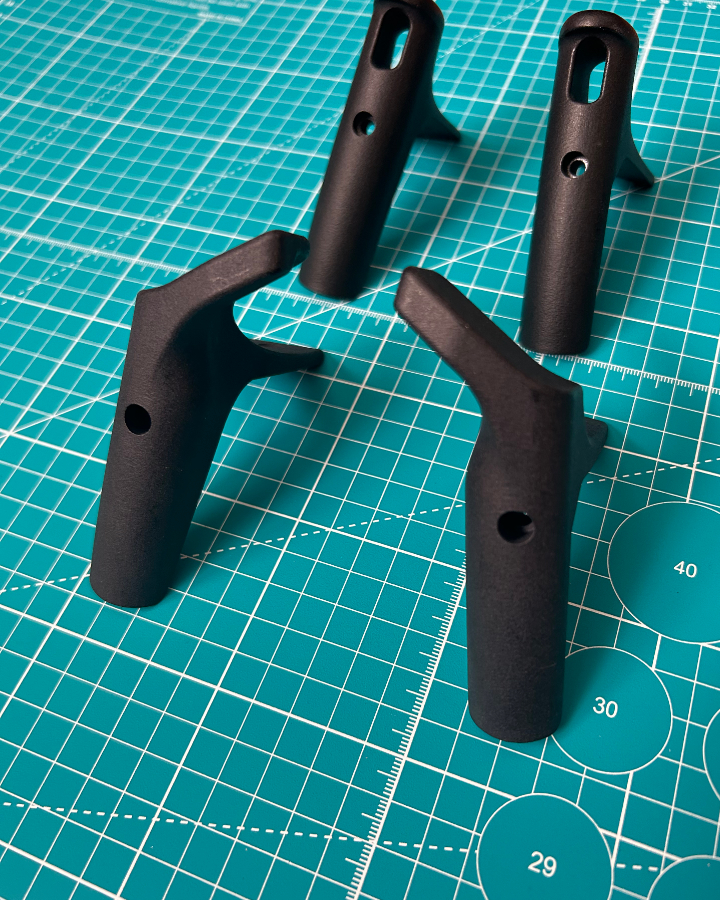
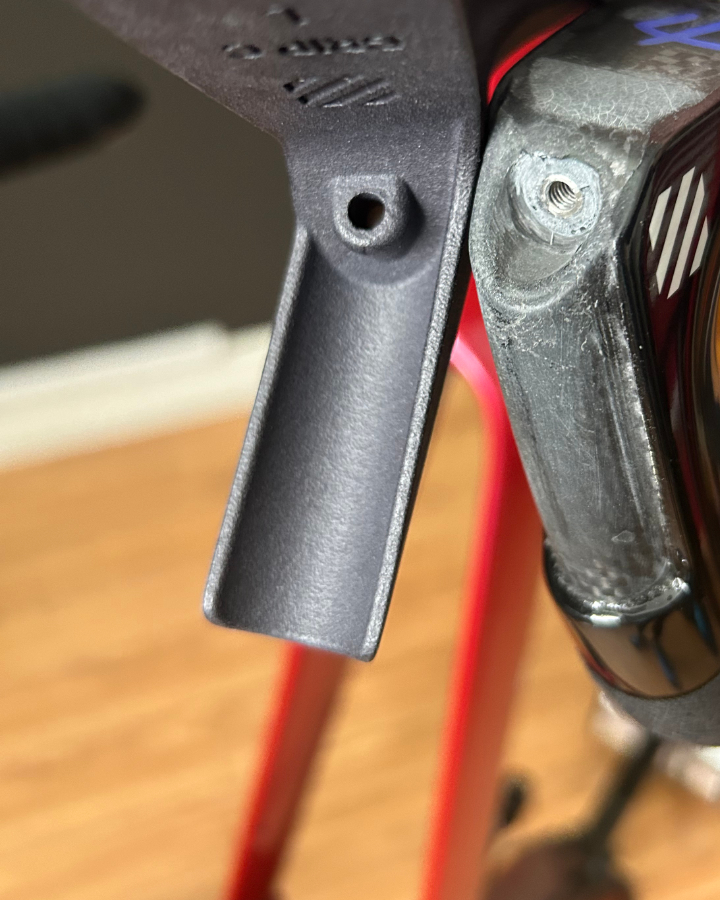
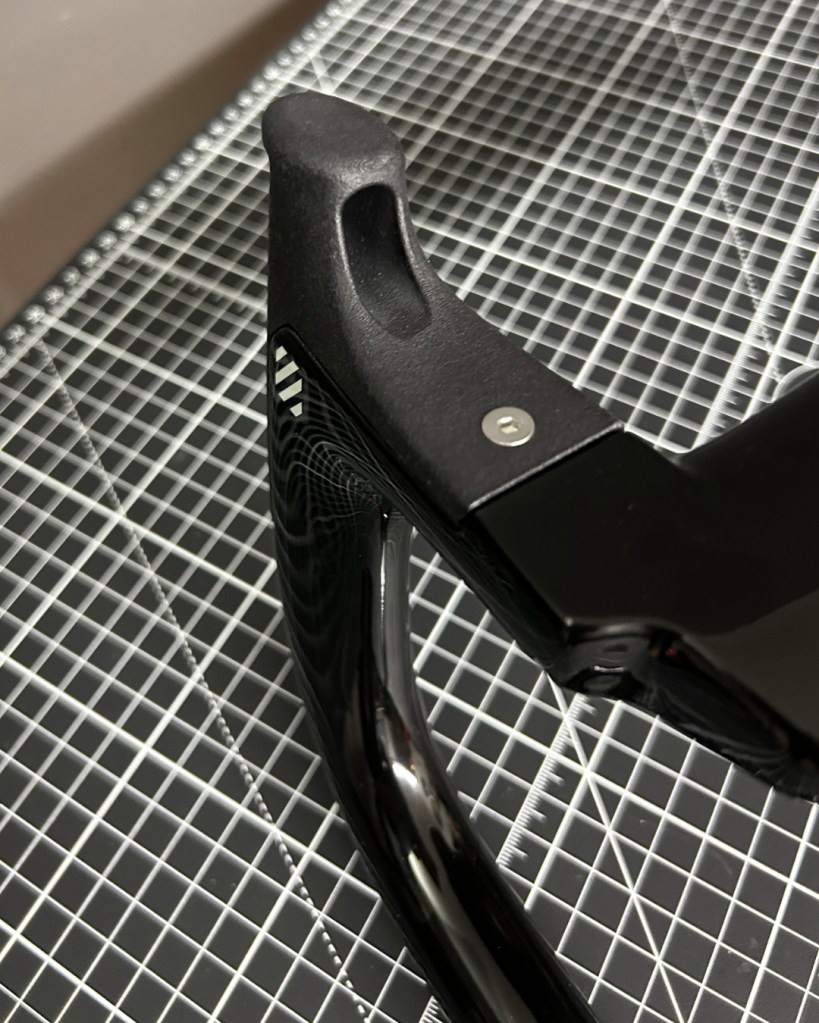
The Grip-C
When I originally purchased this handlebar, it came with the Grip-B, which are fine, but I wanted the grip-C, that seems to offer a better grip and safer position by locking your thumb onto the grip. the grip-C finally arrived and I went on to install them.
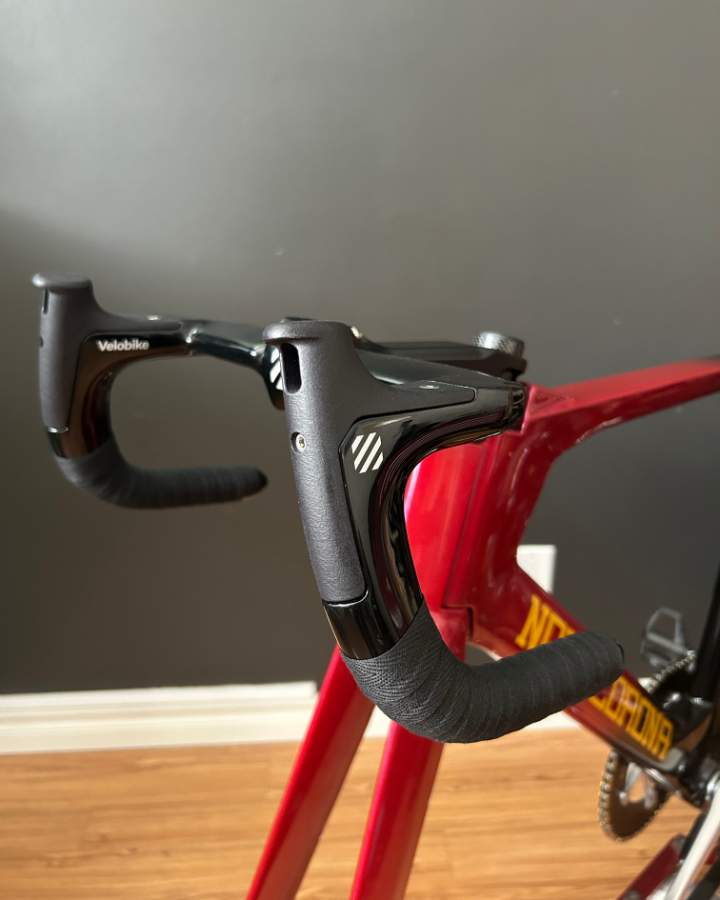
The Velobike Skat handlebar with Grip-B
The Grip-C with Grip-B in background
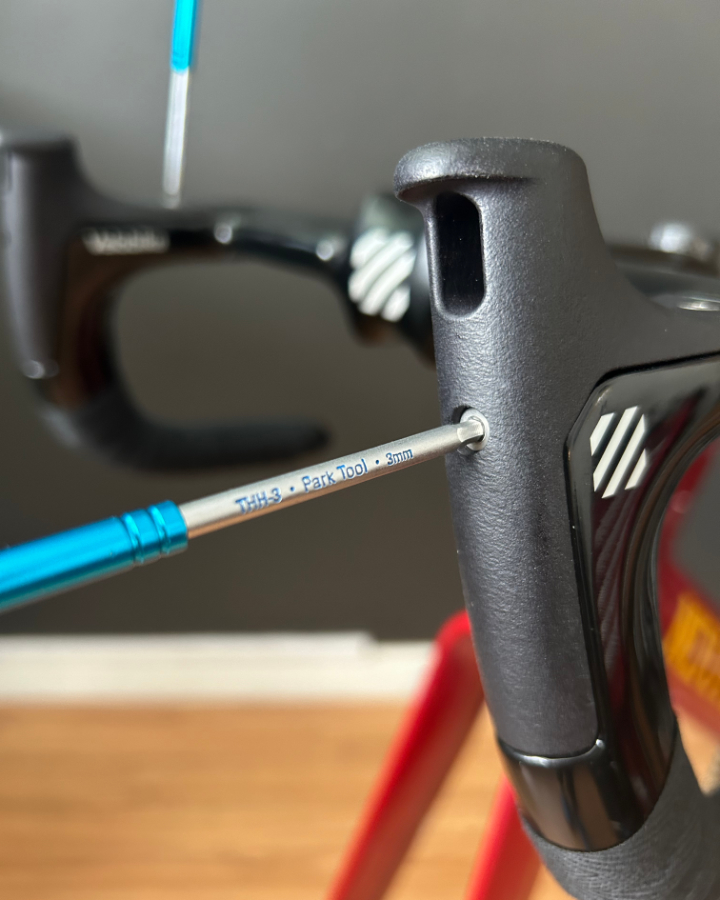
Installation
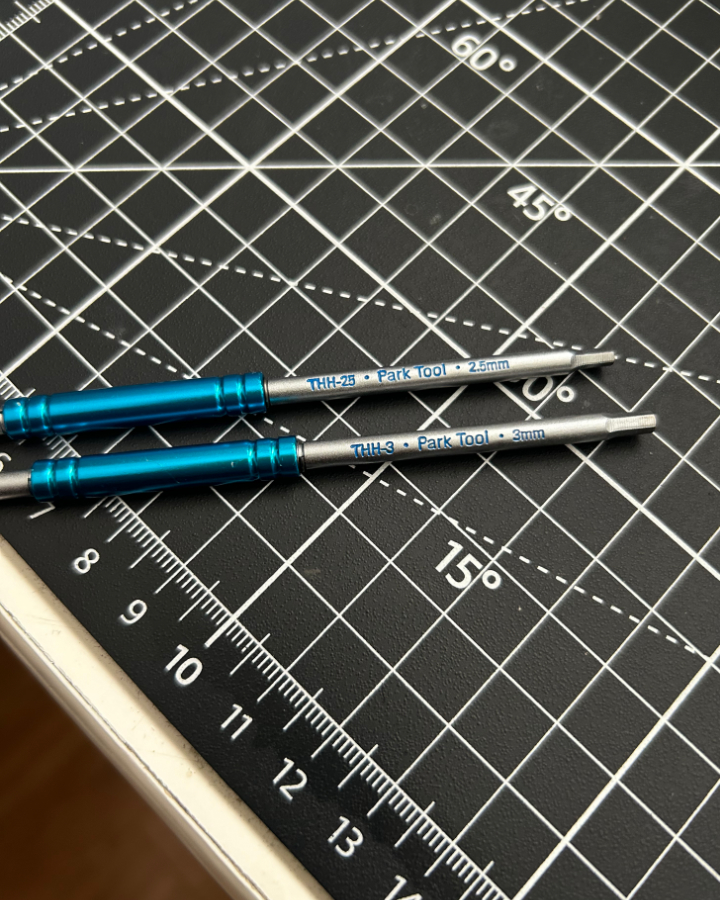
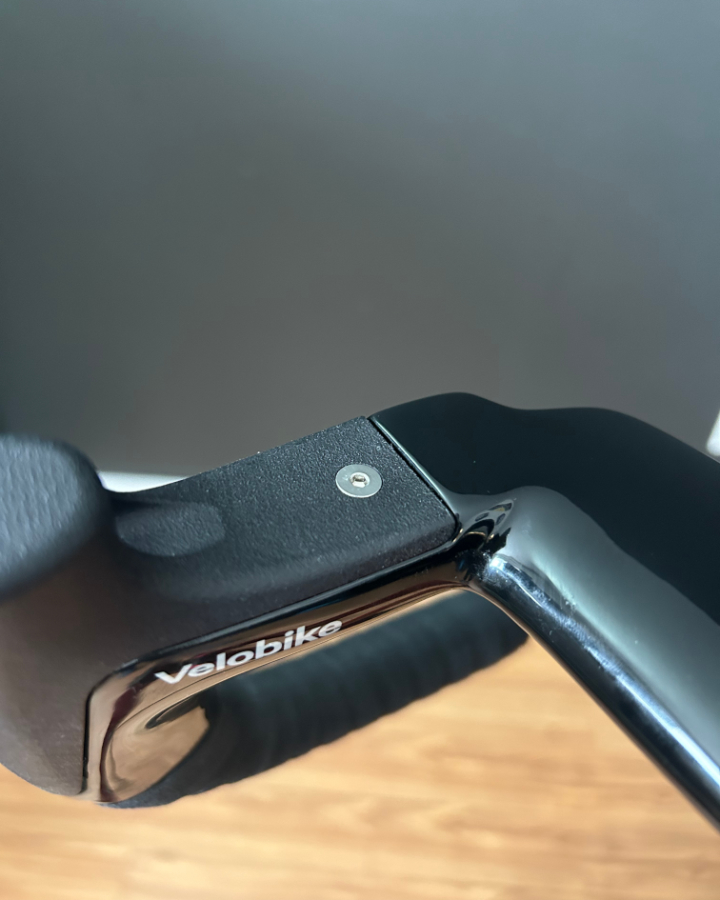
All these grips can be easily removed by using an hex key. Well in fact, you need 2 sizes: 2.5mm and 3mm. If I was the type to change my grips depending on what event I was attending, I’d really wish only one hex key size would allow to remove all the bolts.
After fiddling a bit, I can recommend that if you have to replace your grips, get the top bolt snug before the front one. when I did the opposite, the top bolt was not going in easily, as it was rubbing against the grip itself. Seems like the top hole position could be moved forward by perhaps 1mm…
The installation is still easy and everything perfectly fits. It’s just me being picky considering the high price of this handlebar.
Comfort
Well, I was quite surprised. the Grip-C has a quite sharp edge where the thumb rests. I think I was hoping for something a little more ”round”. I added some Zefal Coton Tape to provide some grip and comfort.
Most pictures I have seen online from athletes using these showed that the grips are actually used as some sort of aero extension rather than ”brake hoods”. It’s only a matter of time before the UCI reacts and bans that kind of usage of the Grip-C. Hopefully, I’ll be able to use them enough before it happens.
Final thoughts
I am still very excited about these handlebars: finally adding a safer grip option, that clearly makes this product unique compared to my Bici hoods, was what I was looking for all along. It will allow me to adopt a very ”aero” position while having a firm and secure grip on the handlebars.
Not ready to spend so much money on handlebars?
More and more options are becoming available on the market. Seems like Bici will eventually come out with a new hood design, so keep an eye out for those. I’d say the strongest contender and most viable option as an alternative to the Velobike Skat Handlebar is the Vision Metron Track handlebar. The Thumb rest is very smooth, rounder and offers a similar grip surface.
There are 2 main things to consider:
– The vision Metron Track is only offered in one width: 36.5mm
– It is very hard to find because it is rarely available.
On a positive note, depending on your position toward high end gear and Track cycling gear: maybe you pay double the price for the Velobike stuff, but it’s readily available, worldwide. When you purchase something from Velobike, you get the feeling and the satisfaction that you are buying a product that was made for track cyclists and that the company cares about their customers.
By proposing a new type of modern handlebars for track cyclist, Velobike challenged the whole track cycling market by introducing new products to a market that is usually dominated by big or obscur companies, offering limited access to the best equipment at ridiculously high prices. So if there is one thing that Velobike have succesfuly achieved, it’s that they have set a standard for equipment usage amongst athletes worldwide. Equipment that they developed, designed and marketed very well to a point that world class athletes and amateurs adopted their products massively.
In fact, they proposed solutions to problems that most track cycling were having. Coming up with a complete catalog of stuff that a close to inexistant critical mass of track cyclist, spread around the world, went on to adopt and perform at all levels with.
Furthermore, Velobike have managed to create products that adapt to the needs of high performance track cycling, that can integrate to existing bike platforms and at a price that is still decent. In a very small market where almost every component is proprietary, this is something quite interesting.
I went to the bike shop
Among the nice things that you can find in Velobike’s catalog, is the Track bike adapter kit for your smart trainer. Something I have been wanting for years when I was more invested in track cycling.
Although I really wish i could ride my track bike on my smart trainer these days, I decided to purchase a set of Skat Endurance Handlebars instead. And against almost everything I believe in, I went ahead and purchased the 300mm wide version. Because, yes, I think the super narrow handlebar trend, especially on the road, is dangerous.
So I can say this, all that will be written here will be my honest opinion and review of this product, that has set a standard in the ”track cycling handlebars business”. If I was the type of person to use clickbait titles, I’d use words like ”disrupting”. and ”broken” to make a tiktok video of this review.
Here is what we are talking about.
Why?
As I am getting less and less flexible, it became obvious that I would spend most of my time riding the track on the top of the bars. For a while, I have been using the Bici Hoods that are great, really great. My search for new ways of finding speed lead me to numerous articles about drag, aerodynamism and how to be as efficient as possible while traveling at high speeds on the velodrome.
Since I failed to find ridiculously narrow alloy handlebars to mount my Bici hoods on, I started to consider the higher end products.
The Bici Hoods
The Bici hoods are a simple yet effective way to add hoods on your handlebar.
I also wanted something that would be close to a ok time trial position, without having to invest in a whole TT setup. I was never a good Time-Trialist, mainly because of my lack of flexibility. I just can’t get into a good aero position and output my best power at the same time. Add to that the amount of time you need to ride in that aero position, fine tune it, fiddle with adapters and expensive parts and yeah, you lost me.
So I came with what seems to be the best alternative. Work on my flexibility just for the sake of staying healthy, and find the lowest and narrowest position that is still comfortable and efficient.
But why, again?, because every bit of time you are not spending to fight against air resistance on a track bike, is time that you can use to either go faster or further.
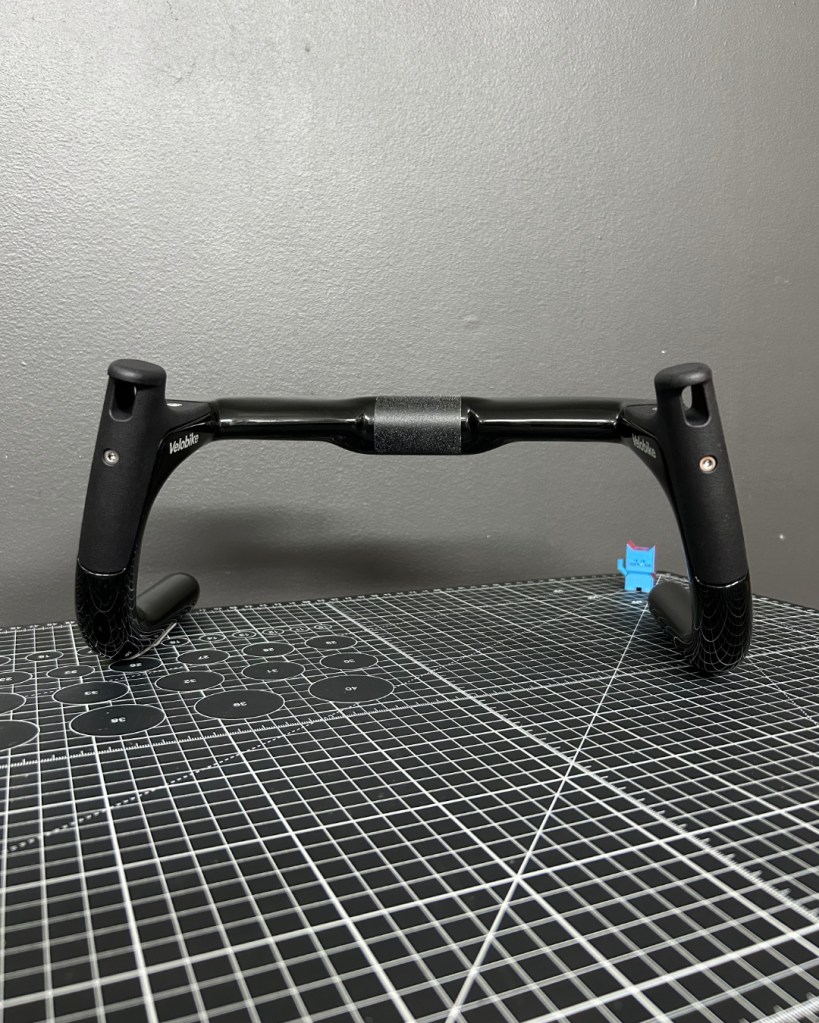
The Skat Endurance Handlebar
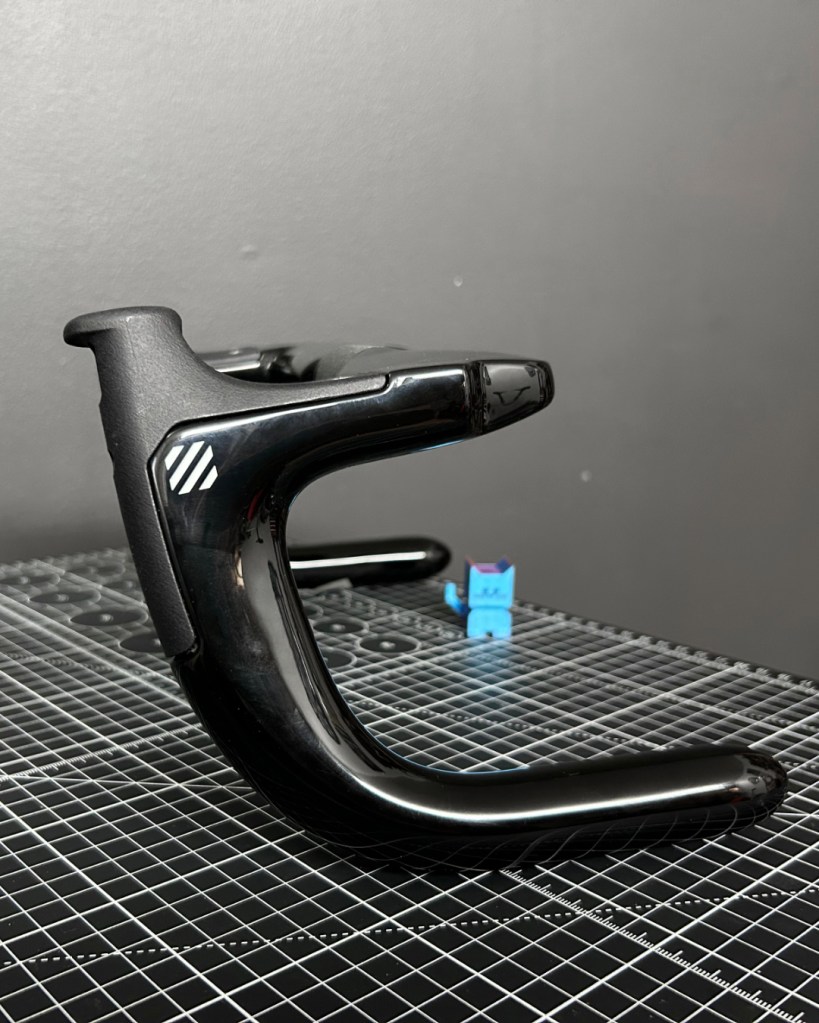
It’s a massive piece of T800, mixed with T700 carbon, with a glossy finish. Notice that there are inserts on top of the bars. Those inserts are interchangeable, offering different types of grips (of lack of). At the time of writing this, only the Grib B were available, but I am waiting for the Grip C, which seems to be the most popular grip used out there. The grips are made of Nylon, and manufactured by using a MFJ additive process.
The Grip-C is the design that made this bar so popular, and finally, some other manufacturer are adopting it and integrating similar concepts into their track bar design. The thing is, track cycling is sooooo marginal, that everything costs a lot of money. A lot. but when you compare the 12 000$ handlebars that some other companies make, the Skat Endurance handlebar is almost inexpensive, (almost).
Aside from the grips, the handlebars have a nice little flare in them, which is nice. It gives some room for the forearms when in the drops and ads a little bit of stability when out of the saddle.
Finally, there is a little notch on the left side of the aero top for your thumb. this was specificaly designed to allow for a better grip when giving your relay during a Madison race. I don’t see myself using this but for real endurance riders out there, it’s a plus.
The specs
There are 4 sizes available for the Skat handlebar. Ranging from a super narrow 275mm width to a casually narrow 350mm width measured centre to centre at the drops. With a 15deg flare, the width at the grips is narrower.
Every grip can be replaced by another model to suit your needs. Those are feel pretty solid. I would not be afraid about breaking them.
More info:
– UCI legal for the 2023 ruleset (Yes I am afraid the rules will change and that I wont be able to use them next year)
– Designed and tested to exceed 1.5x ISO strength requirements .
– Ceramic gloss finish
– Japanese Toray High Modulus Carbon Fiber (T700 and T800)
– 275mm, 300mm, 325mm and 350mm widths (center to center) 110mm drop (center to center)
– ø26mm grips
– ø31.8mm stem clamping area
– 15° grip angle
First Impressions
I rode with my new bars for 45 minutes on the rollers. I’d say the Grip-B is very similar to the type of support and comfort that the Bici Hoods provide. I can’t wait to get the Grip-C to try them out for additional support.
The width is surprisingly comfortable. The flare is perfect. At first I thought I would have wanted more flare, but it turns out that 15deg is the sweet spot.
The Madison grip is quite nice but I am not sure it suits all hands sizes. I have fairly square shaped medium hands, it’s perfect. Smaller hands will maybe have less support and larger hands will probably have issues fitting the thumb between the stem and the bar. As I can’t change hand size, I’ll have to get people to try it out.
I think the only thing I would have wanted to be a bit different is the Bar end. It’s pointy, and I would have preferred a non-tapered, flat end. A bit like the Novacorona Ares Bars.
What’s next?
Testing.
Who knows how many watts I could be saving with the Skat Endurance handlebar. So I’ll be testing different setups, and comparing values. It’s quite basic since I only have a powermeter to do that testing, but the velodrome is a fairly stable environment and it’s easy to test different equipment while respecting some basic parameters like speed and bike fit.
This is one aspect of track cycling that is quite annoying for amateurs. No one shares their data. It’s such a competitive cycling discipline. I am sure that testing all that equipment is costing a lot of money and once a federation had found a fast formula, they have no incentive to share it with others. Which makes sense.
The struggle to install tubeless tires are home might be over. Especially if you have limited room and no space for a small air compressor. Introducing the Pressure Overdrive pump from Lezyne. A floor pump with an air canister attached to it that supposely can help you seat any tubeless tire. I have been testing this floor pump for the last 6 months and here are some thoughts.
The Lezyne Pressure Overdrive floor pump is a big floor pump and thanks to its air canister and foot activated release valve; it’s ideal for seating tubeless tires at home and on the go.
The secondary chamber (the canister) can be pumped up to store air under pressure. This air can then be used to seat a tubeless tire. If the tire was properly installed and centered over the rim, this sudden blast of air can easily seat the tire bead of any road, gravel and most mtb tires.
I did a video review on my youtube channel about this Pump. I’ll link it a bit later in the article.
Some cool specs
The Pressure Overdrive boasts some cool features that are inline with Lezyne’s innovative nature.
It’s got a huge gauge. It sits at the top of the pump so not only is it easy to read, but it’s also less prone to get damaged and collect dust.
The (infamous) Lezyne air chuck also has an incorporated valve core remover. Quick tip: if you remove the valve core before trying to seat your tubeless tire, you will greatly improve your chances of succeeding.
Most of the small parts are available from Lezyne or their distributors, so you can replace the chuck, the hose, the gauge, etc. Even the wooden handle is available.
It can inflate tires up to 200psi.
How it works
It works just like a regular pump, but keep in mind that you should always keep some air in the canister, even if you don’t plan on installing tubeless tires. If there is no air in the canister, the air contained in the tire will flow in the canister. That means more pumping.
Once you operate the foot lever, the air in the canister will flow in the tube/tire/tubular (or the other way around if there is more pressure in the thing you are trying to inflate) until the pressure in both is equal. Only then it is possible to inflate to the desired value.
Before disconnecting the hose, make sure you close the canister valve. Otherwise, you will lose all that hard gained pressured air. (It happened to me a lot, and it sucks.)
Does it work as promised?
Yes! Especially if you remove the valve core first. And there are more ifs:
Make sure the tire is well installed
Make sure the rim tape is in good condition
Get as much air as you can in the canister. Don’t think 80psi will be enough, it won’t.
Once you open the valve, the air will quickly rush out of the canister. Make sure you can help the tire seat, or ask a friend to help you if you have one of these super supple tires. (Like a Rene Herse extralight).
Is it a good everyday floor pump ?
Not really. First of all: It’s slow. Although the actuation is very smooth, and it’s easy to get high pressures out of it, the volume it displaces is quite low. If you are in a rush before a race or at the shop, I would not be using that pump.
Then, keep in mind that a lot of people just can’t manage the Lezyne ABS chuck, so you will either have to help them inflate their tire or replace it when they break it. I’ve been dealing with that chuck since it launched and I can tell that it’s not a popular feature.
Luckily, Lezyne also makes a more traditionnal chuck, the Dual Valve Pump Head, that can be installed on any of their pumps.
The pros
It works for what it was designed for. Sounds obvious right? Well not all air canisters work and not all of them have the built quality of the Lezyne.
The huge quantity of spare parts available for this pump means that your investment will last and you will be able to maintain it over time.
It can also inflate track tubulars. Yeah, at the opposite of the tire technology spectrum, you will find tubulars. A stitched closed tire casing with an inner tube stuck inside, sometimes made of latex.
Thanks to a gauge that goes up to 200psi, and because the pump is actually easy to operate, even at high pressures, this pump can become your track day pump. Incidently, a Silca 90degre pipe fits the ABS chuck threads perfeftly.
It’s built to last. The Pressure Overdrive, like most Lezyne products, is made of quality materials, more often then not machined alloy and steel. High grade plastics are used for smaller parts.
The cons
It’s bulky and not well suited for travel or weekend rides. So you’ll need a second pump to throw in your car or the keep next to the door when you just want to add a wee bit of air.
The ABS chuck is a well designed product. I personnaly dont mind it, but I know it’s not made for everyone. It can lead people to get so angry at their pump… believe me. There is a lot of tightening and untightening involved in inflating a tube or tire with a Lezyne pump. Plus, I’ve seen countless amounts of valve cores behind removed by accident by unexperimented Lezyne pump users.
Get the Dual Valve head and be happy. 🙂
Let’s talk about the price
At 149$us, 199$cad, the Pressure Overdrive pump is not cheap. Heck it’s the price of a small air compressor.
But the built quality is up there. The many functionnalities and characteristics are worth the price. Plus it’s a non-disposable product: spare parts are available and easy to find. If you care about keeping your stuff for a long time and reduce your consomption of products that end in the bin, any product made by Lezyne is made for you.
Is it for you?
If you enjoy doing your own mechanical work, and you have to deal with multiple tubeless wheelsets, this could be for you.
Especially if you have limited space. Perhaps, like many, you live in a small appartment or far from a bike shop.
If you only have one bike, and don’t care about tubeless installation, this is probably not for you. There are better floor pumps for general usage. Also keep in mind that dealing with tubeless tires, sealant, rim tape installation and worned out valves can be frustrating and exhausting. Sometimes it’s just better to bring your stuff to your local bike shop and have them do the work, with better tooling and more ressources.
Verdict
As a ex professional mechanic, dealing with many tubeless wheelsets, the Pressure Overdrive pump is the best home mechanic pump I could hope for. It’s also, I must say, the minimum I would go for considering the high volume of bikes I have to maintain. Anything less than what the Lezyne Pressure Overdrive has to offer would simply not cut it.
During the 6 months I used this pump, I also came to the realization that I am probably going to need a small good quality air compressor.
Video review
About the testing and review:
I purchased the Pressure Overdrive pump with my own money. Although Lezyne sent me many products to review over time, they did not have access to this review before posting it. My review and opinions are solely based on my experience with the product.
Is the Brooklyn Machine Works Gangsta V4 a worthy track bike?
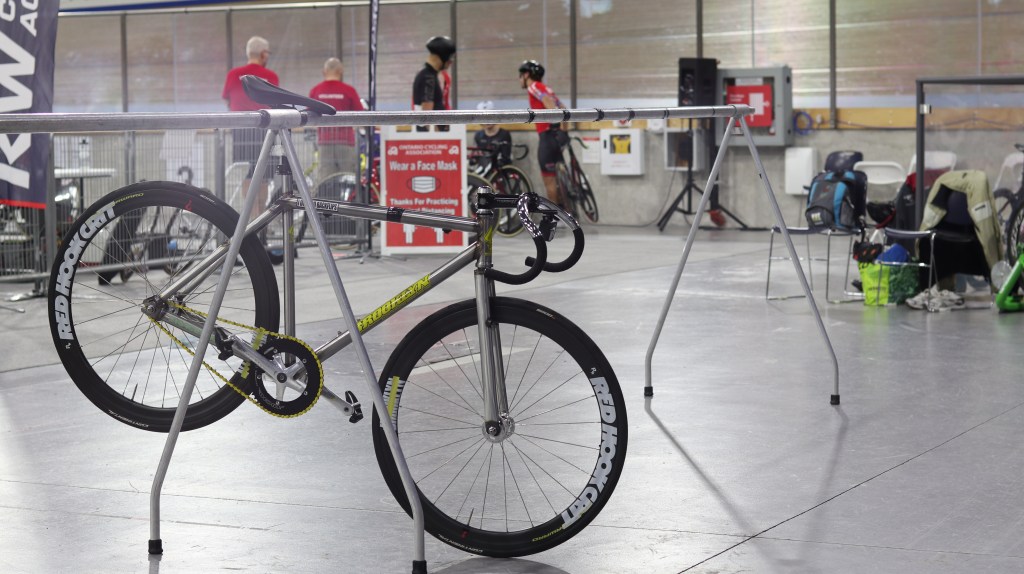
Not long before my Cinelli Vigorelli Shark was officially banned from the velodrome, I had registered to a 2 day race at the Mattamy National Cycling Centre in Ontario (Canada).
So I had to quickly turn around and find something to race with. I was expecting Cinelli to send me the newest Vigorelli, which is UCI legal to replace the Vigorelli Shark. But things being what they are since the Covid-19 pandemic, that sponsorship never materialized and so I was stranded on the cote d’azur (so to speak) with no perspective of riding anything but my rollers.
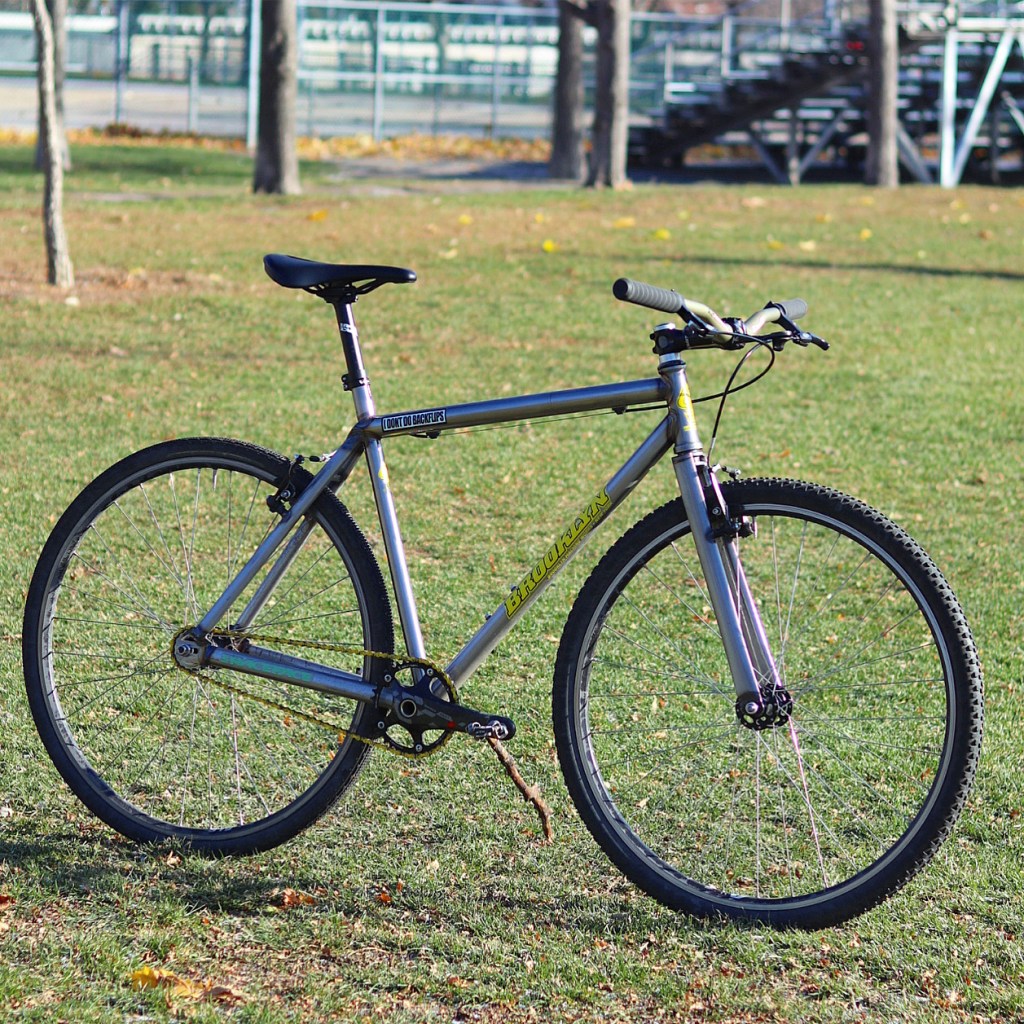
Then I stumbled upon my Tracklocross bike and took a serious look at it. What if?
This odd thing has enough clearance for 700×40 tires and yet is built around a track geometry with a steep head angle, high bb drop and short seatstays.
Who the hell are Brooklyn Machine Works
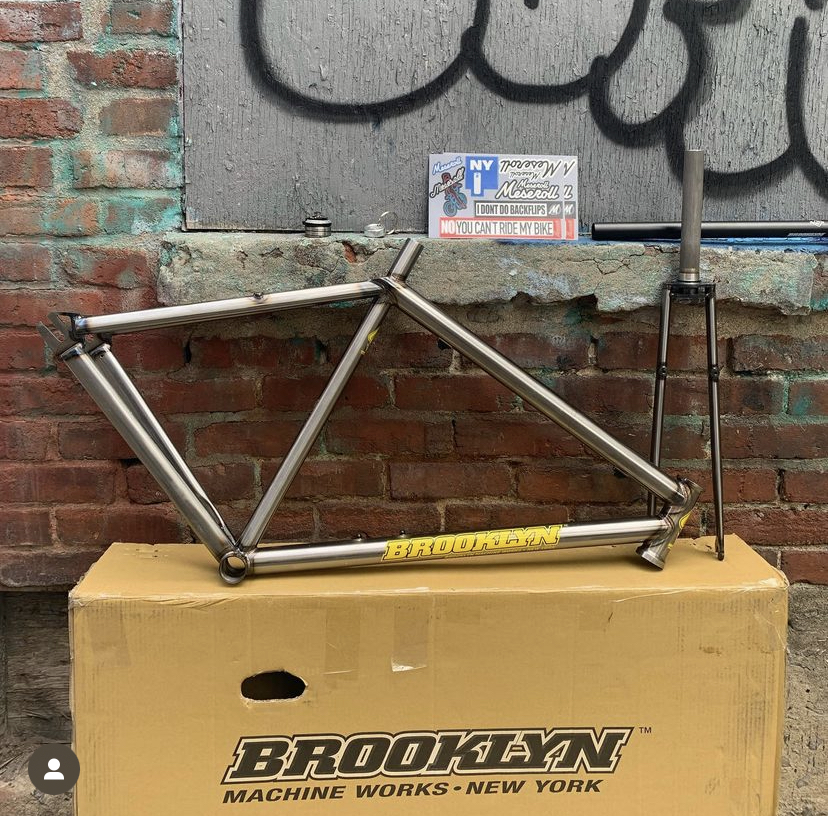
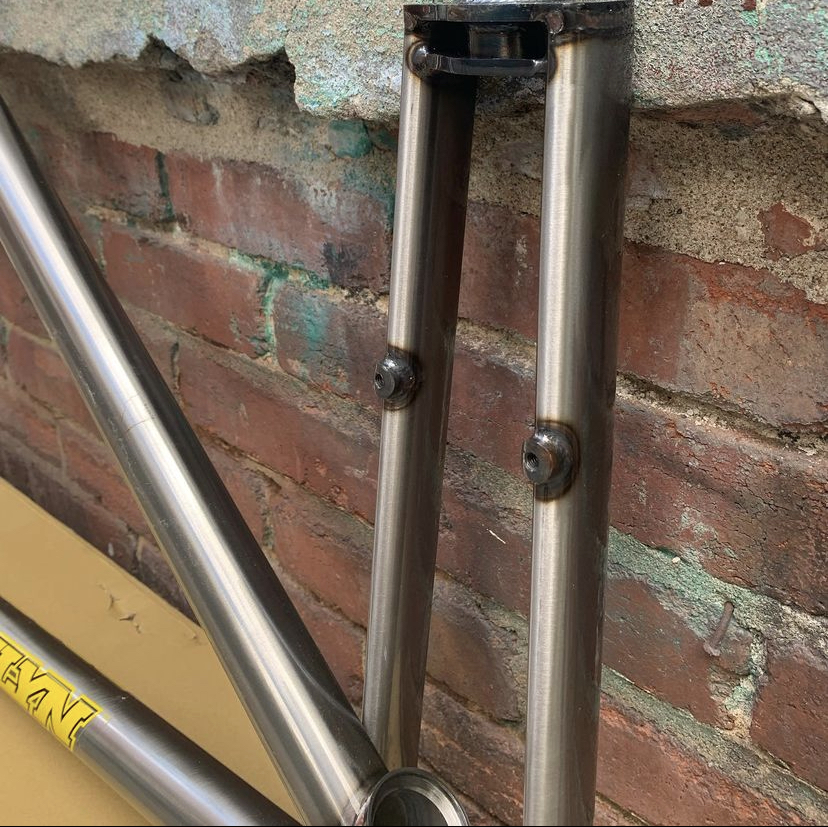
I purchased my Brooklyn Machine Works Gangsta V4 from a bmx shop in New-York. That frame is uber rare and I was glad I could find one. (although I admit I was looking for a Mash Tracklocross frame set). One could say I have a thing for single speed bikes and one would be right! Now, if you don’t know about Brooklyn Machine Works, no one could blame you. They are not really into the road bike, gravel bike and track bike scene.
It’s a small company that used to make downhill bikes and pretty special ones too! Their design and engineering was unique and their bikes were considered as ”exotic” although they were US based. They became a cult brand and I am pretty sure people are still wondering when, if ever, they will start producing frames again. Here is a short article about them and how still today people look upon them: Brooklyn Machine Works .
The build
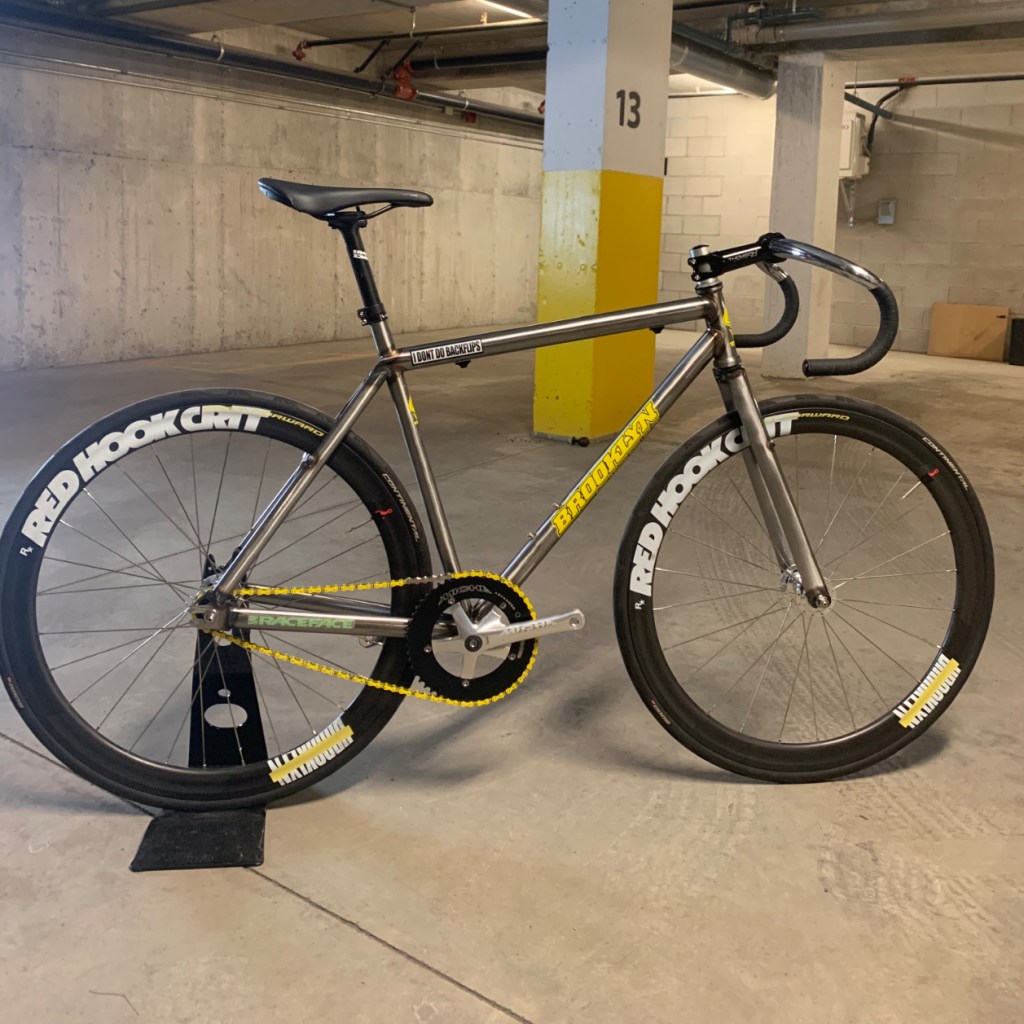
Although most people ride their Gangsta V4 with a fixed gear and no brakes, I opted for the safer (at least for me) freewheel and v-brake build, all that kitted out with a wide downhill handlebar.
Originally, I never intended to use this bike as a true Tracklocross bike as I am not skilled enough to handle a fixed gear in any other environment than a velodrome. But now facing the fact I had no track bike for the upcoming event; I decided to remove the ”locross” from the Tracklocross and convert the bike to a simple steel frame track bike.
So I went on and removed the v-brake bosses and installed all the parts from my Cinelli on the BMW Gangsta V4. (If you wonder if there was a V1 and then V2 and eventually a V3 of the Gansta the answer is: Yes).
The ride feel was better than I expected. The geometry, even with 700×25 tires which I guess the bike was not designed for, handled great on the track. It was predictable and stable with no speed wobble at ”higher” speeds.
The main downside was the weight. Geeezus it’s heavy. Even with carbon wheels. Added to that was the total unresponsiveness of the bike. Even with top tier quality parts like Miche Primato cranks, a Izumi chain, carbon wheels and a dura-ace cog; power transfer felt like I was driving the rear wheel with a rubber band instead of a high quality 1/8 track chain.
Am I blaming the bike for my somewhat bad performance at that event? Absolutely not. When you can’t perform to your full potential because of inadequate equipment, you can still try to perform good enough by adapting your tactics and racing smart. Which I tried to do to the best of my abilities.
So if you are wondering if you Gangsta V4 is Track worthy, (you would be one of the very few to own such a frame) well I’ll say this: Yes it’s good for track. But it is not good enough for high level racing for many reasons:
The frame and fork are heavy
I doubt the fork is UCI legal
It sure is not aerodynamic
It is not the stiffest frame for track racing (although stiff enough for Tracklocross)
Never again
Although the whole ”riding a funky bike at a national event” experience was worth it, I retired definitively the Gangsta V4 as a track bike and went on to find something else (more on that later). The track scene is rapidly growing in Canada and it is a good thing for our sport. It also means that people are investing more time, effort and money into track racing which creates some levels of inequities when it comes to the stuff people race with.
I was fortunate enough to find a unlikely replacement bike within my own collection of bikes but also realized that things got serious at the velodrome. Now the gear you use has an immediate impact on performance, provided that you have enough race sense to be able to race track events (which comes with training and experience).
I am not saying that everyone should go out there and buy an expensive carbon frame. But my advice would be to find a good quality alloy frame, like the new Cinelli (if you can find one) and kit it out with good parts. Finding good tubular wheels is a must. Don’t spend too much on things like the handlebars and other periphery components. The real deal is in the wheels and the drivetrain. Once you got that figured out you’ll see what’s your next best move. Purchasing good rollers could also be a nice thing. I digress…
If you are curious about Tracklocross, I’ll have a few articles about that really cool discipline.
Steel’s for real, but sometimes it’s just just real enough to make a good post race recovery lemonade.
Side by side: The Track build and the Tracklocross build
Here is my youtube video about my weekend at the track riding the Gangsta V4 as a track bike.
Looking to spice up your local crit racing scene? I did, and here is how it went.
We have a local crit series for Masters in the Montreal area. And I have been attending those races for a while now, probably since 2008, on and off. So after a while, a few podiums and the repetitiveness of doing the same race series over the years I was kinda looking for a new challenge. The question was: How can I keep the my stoke level high, while I was kinda getting bored from doing those same races over and over again?
And I had this idea, in the back of my head, for a long time now. I eventually sat down with Josh at Ibike and we talked about racing. The whole crew (my race team) is (was) kinda new to the racing scene and I am for sure at the opposite of that. So I did not want to kill the vibe; While everyone on the team was looking forward to the next event, I was looking away for something else.
I told Josh: What if I raced a single speed crit bike? Not a fixed gear crit bike but a freewheel single speed bike, with 2 brakes!
And the project started like that. Of course, the bike could also be used on the track (although I knew it would not pass the UCI inspection. More on that later or in another post).
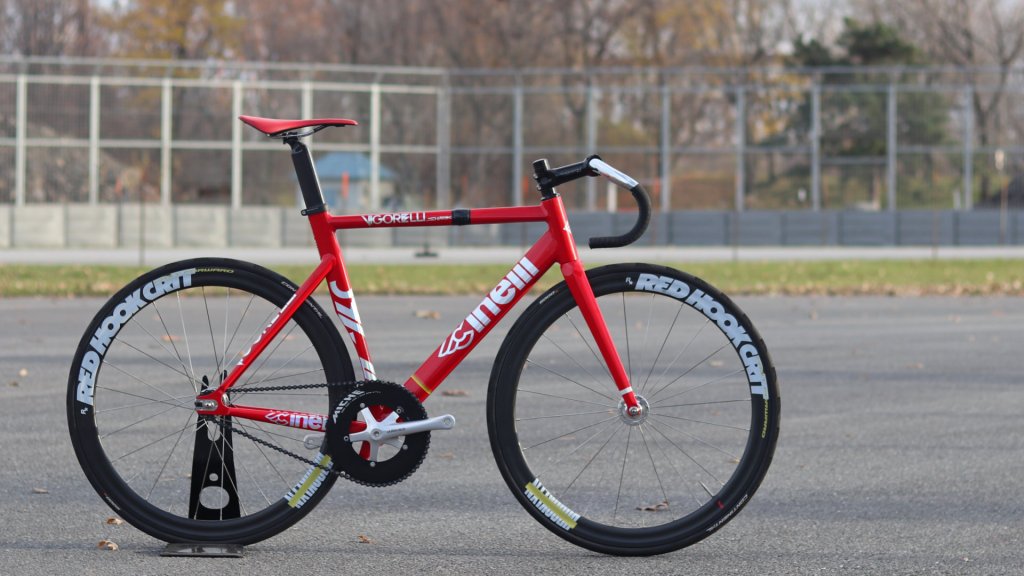
Josh came back to me a few days later and I was stunned to be handed a brand my new Cinelli Vigorelli Shark Frame set (like fully sponsored!). I quickly went back home and started gathering parts for my project. The main concern was to find an appropriate gear to sustain the race speed, accelerations and hopefully take part in the final sprint.
The build
Road Version:
Cinelli Vigorelli Shark (M) Mavic A319 32h rims Formula Track hubs (sealed bearings) Ridea Crankset (I replaced it with a Shimano since the build video) Izumi chain (straight from Japan!) Specialized Toupé Expert saddle Zipp Service Course Stem (130mm) Zipp Service Course HB (42cm) Cheap Tektro brake levers FSA K-Force Brakes Gear Ratio: 56/16
Track Version:
Cinelli Vigorelli Shark (M) FFWD Redhook Edition Clincher wheels Ridea Crankset (I replaced it with a Shimano since the build video) Izumi chain (straight from Japan!) Specialized Toupé Expert saddle Thomson X4 stem 0deg (120mm) Deda Velocity steel track bar (40cm) Continental GP5000 700×25 tires Gear ratio: 51/14, 52/14, 56/15
So I build this bike to race criteriums. There was no doubt in my mind it was a cool idea. I was so motivated by this project that I did not care about the ”pure” fixie haters who were commenting about me running brakes and I did not care about all the 15k$ bikes I would have to go against. In fact, it was even a motivation for me.
The bike is somewhat ”UCI legal” in the sense that it has 2 brakes, a freewheel mechanism, spoked wheels, a road handlebar… basically, all the stuff one would find on a regular road bike minus 10 sprockets or so. On the other hand, I knew the frame was not UCI legal because of the ”fin” featured under the BB, hence the Shark name.
But honestly, when you show up at a local criterium race, I don’t think anyone would be bothered to complain about that feature considering it does not give any advantage to the rider and causes no danger to the other competitors.
My goal was to perform with that bike to a similar level that I would with my regular road bike. And that is all I had in mind.
First race
Our local crit series is close to where I work, and live. So my first time riding the bike was on my way to the event. Riding at a warm-up/commuting pace with a single speed bike is not something strange to me. But doing it with such a huge ratio is. It didn’t take long before I started thinking this was a bad idea.
I got on site after riding 40 minute at probably 70rpm and I thought it would not go well. My legs were heavy. The race format is quite simple. All categories start at the same time and there are 4 final sprints. Basically, the faster guys finish first and so on, with 2 laps between each final sprint.
In the race, I was surprisingly satisfied with my gear selection. I could easily follow the 43-45km/h average and survive the few 50km/h bursts here and there. Anything faster was really hard and I had to rely on those distant high cadence drills from my track days.
I finished 3rd on that race. I knew I had something going on. It was a great feeling.
Technicalities
You might wonder why am I relying on a huge Chainring and quite easy freewheel combination. So I’ll explain why I went for that specific gearing and also why I didn’t have much choice.
Most track bikes have a rear wheel spacing of 120mm; So does the Vigorelli Shark. So I had to use a track hub. They do come in various declination of configurations but the axle always measures 120mm:
Fixed (single side)
Fixed (dual side)
Fixed/Free (commonly called Flip-Flop)
The thread size on those hubs, to mount the fixed cog or the freewheel, is 1.37 x 24 tpi. The freewheel threads are usually deeper to accommodate the freewheel but you could ultimately install a freewheel on a Fixed only hub. The freewheel would hold on with less threads but I am confident that it would hold well for most cyclist.
That thread size is a limitation when it comes to freewheels. As a matter of fact, to be able to fit a freewheeling mechanism in between thread and a cog, you need some real estate that dictates the minimal inside diameter of the cog. Therefore, unless you run a BMX hub, with a spacing of 110mm and a thread of 30mm x 1, you can’t use anything smaller than a 15T freewheel. They just don’t exist.
So this led to finding a big enough chainring that would allow me to have a nice cadence in most race situations but that would also clear the chainstays. In fact, the first crank I used for that build was a Miche Primato and the 56 would rub against the chainstay because of the narrow chainline. The Ridea solved that problem for a while until I eventually wanted to try a 59 chainring. The Shimano Dura-ace track crank set was the final option and last one that I tried. I works, but it does rub sometimes under extreme sprint loads. (anything above 1700w will make the chainring rub a bit against the frame).
If you are looking for a ressource to determine your maximum speed at any given cadence, with a specific tire size you should refer to Bikecalc.com . It is a very useful ressource that I often use for custom Gravel bikes when people consider going 1x and fear they will lack high or low gearing.
Here is a grid specific to my Cinelli Vigorelli Shark set-up.
Considering how ”light” the gear is in a race that averages around 44-45km/h, is was quite hard to sprint against guys using road bikes. In fact, I had no punch, no torque so to say, to initiate my sprint. So I had to resort to sprinting while seated at a high cadence.
Adapting my race strategy
Considering the limitations I had I decided to stop concentrating on the final sprint and decided that it would be better for me to try to launch an attack with a little under 3km to go. That light ratio still allowed me to punch quite fast to create a break in the peloton and hopefully start a small breakaway with a few willing guys.
Turns out that no one wanted to follow those attacks and I ended winning 3 or 4 races in a solo breakaway. I felt like the Houdini of crit racing, being able to escape the pack and win solo.
Bridging to existing breakaways and holding on with the faster guys was quite a challenge. The lack of torque and the high cadence meant I was limited to hold on the wheels and skip pulls as much as it was acceptable.
Fun fact
In a humble way, as I was proud of going on with this project and the results I got. In fact, I am pretty sure this is the first time anyone attempts this, at least in the Quebec province. But it did not catch on with other racers. It actually took a while before anyone noticed that I had a single speed bike. And because people got used to the ”Fixie” bike trend, most of my co-racers thought I was riding a fixed gear bike in a road criterium. (Which of course is not ”ok” by any stretch of imagination).
The Cinelli Vigorelli Shark crit bike is a really nice project but it proves again that like most things in life, you have to do them for yourself and your own personal growth. There was absolutely no hype associated to this adventure, which is ok, but I did feel like it should and could have got more attention and recognition. I guess it is only human to feel so and I eventually got over it.
What’s next
We have a race series in Montreal called ”les mardi de Lachine”. It is a very fast criterium with average speeds around 50 km/h. Since the pandemic, it was canceled but apparently it will be back in 2023.
My goal would be to re-assemble that frame and race those events with the bike. At least once, hoping that I’ll be able to hold on the pack.
It will require a combination of appropriate gearing and good/optimal physical condition. One of the two can easily be taken care of.